June 5, 2022
Before WWDC22 gets started tomorrow, I wanted to announce that there will be no LIVE near WWDC show for 2022.
Why no show this year?
First, I’d love to do a live show. A live performance has an energy that just isn’t there in an online event, and I’ve missed that a great deal.
That said, this has been a particularly unpredictable year. A fair number of people are coming to the area for the WWDC special event at Apple Park, but when and where to hold a show? How big a venue? Some people are in town for a day or two, some are staying longer. Some folks are staying up in San Francisco, some in the South Bay.
It felt like there were too many unknowns this year to produce a show while hoping all the guesses were good enough to make it a successful one.
Besides unpredictability, another possibly more important reason is weariness. I don’t know if it is just the past two years taking its toll or some other cause, but the year so far has felt like trying to walk quickly while wading through waist-deep water.
And so, for the first time since 1999, I will be attending WWDC without being on stage presenting, performing a new James Dempsey and the Breakpoints Song, producing a LIVE near WWDC concert, or some combination of the above.
This is a big change from how I’ve experienced WWDC for the last two decades. Part of me is disappointed to break the tradition but another part of me is excited to spend the week focused on the conference without the stress of putting on a show.
There will be one bit of music from me this week. I am happy to be performing my ninth annual WWDC Week In Review song on Friday at try! Swift Dub Dub. It’s a lighthearted musical look back at the week.
I’ll be kicking off the virtual conference at 10 am Pacific time. Registration is free and I encourage you to check it out.
Thanks for all of your support of our shows and I and hope to see you LIVE near WWDC in 2023. •
P.S. If you need a James Dempsey and the Breakpoints fix this WWDC here are some links to some past endeavors:
The Liki Song
Futureproof
One More Thing…
Categories: Apple, Mac, Music, Software Development, iOS
August 31, 2021
The tabs at the top of apple.com have been around for over two decades now.
Looking at the changes over time shows changes in Apple products, priorities, and design. For long-time Apple watchers it also provides a walk down memory lane.
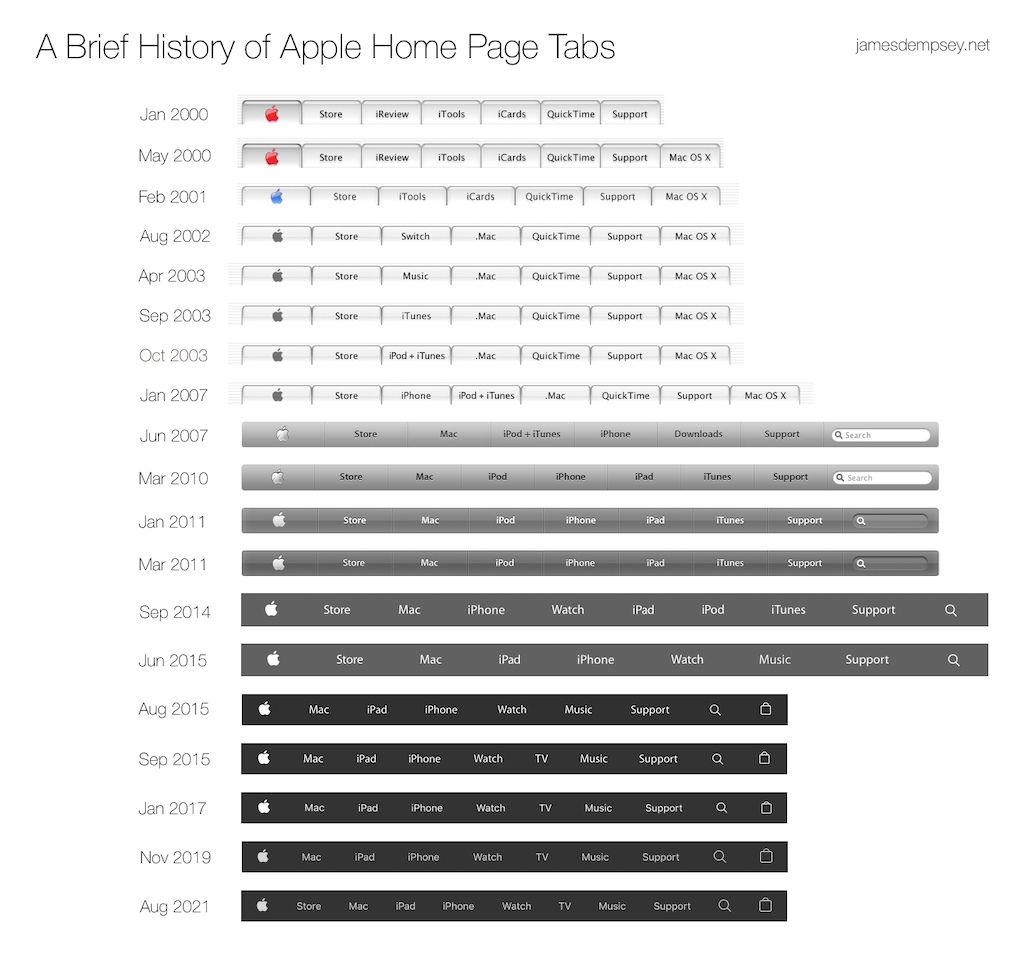
Click for full-sized image
The phrase ‘home page tabs’ itself has become a misnomer as the design has evolved from the original tab styling to a plain, clean navigation menu.
But they were tabs on a tab bar when announced by Steve Jobs at Macworld Expo San Francisco on January 5, 2000:
“We’re adding a tab bar on the top of apple.com. So that we can get viewers more easily and readily to the places they like to go.”
Twenty-one year salute
When the tabs were introduced twenty-one years ago they combined elements of two of the biggest Apple announcements of the day.
At that keynote, Apple announced Mac OS X and demonstrated the Aqua user interface for the first time.
Although the first commercial release of Mac OS X would not be until March 2001, Apple fans could get an immediate sampling of the new design aesthetic at apple.com. The top of the redesigned Apple home page included a row of Aqua tabs.
But what was in these tabs?
The three center tabs focused on online services announced at Macworld San Francisco that year.
Those services were iCards—electronic greeting cards with premium graphics; iReview—website reviews and ratings curated by Apple; and iTools—a “revolutionary new category of Internet services”. The iTools services consisted of KidSafe, HomePage, iDisk, and Mac.com email.
The revolution was not long-lived however, with KidSafe and iReview surviving less than two years. The remaining services were discontinued or replaced as iTools progressed from .Mac to MobileMe to iCloud. Today, legacy mac.com email addresses are the only remnants of the original set of services.
The other four tabs were direct links to the most visited areas of apple.com.
Two of the tabs have had a lot of staying power—the Apple tab on the far left and the ever-present Support tab on the far right. The QuickTime tab led to software downloads and online video content like movie trailers.
In the second position, the Store tab appeared destined to be as long-lived as the Apple and Support tabs. But then it was removed six years ago, never to be seen again. Or so it seemed…
Store tab restored
Like an old friend you haven’t seen in a long while, the Store tab returned to the lineup of the Apple home page tabs earlier this month.
Present from day one, the Store tab lasted for a decade and half before it disappeared in August 2015. At that time the Apple Store became integrated into apple.com product pages and ceased to be a separate site. The Bag icon was added to the far right of the tab bar instead. (Read The Details Here)
But now, the Store tab returns to its former glory as the shopping-focused sidekick of the Apple tab. While purchases can still be initiated from product pages, the restored Store tab leads to a site similar in layout and appearance to the Apple Store app.
Why the comeback? Although Apple did not make an announcement, there are a few likely reasons.
First, from the home page, it’s not obvious where to navigate to make a purchase. A dedicated Store tab makes that very clear.
Second, the store page gives Apple a place to highlight products like AirTags as well as solutions that cross multiple product lines—things that don’t fit logically into the existing tabs.
Finally, the store page provides a place for all shopping-related information: retail store locations; shopping, setup, learning, and support help; payment options and seasonal promotions.
In retrospect, it is surprising the Store tab did not make its reappearance sooner.
Keeping in style
Although the tabs themselves have remained stable for over half a decade, there have been a few stylistic changes along the way.
Most notably, the font changed from Apple Myriad to the system font San Francisco in January 2017.
The original font used in 2000 was Lucinda Grande—the longtime system font of Mac OS X. In June 2007 when the tab bar style no longer mimicked Mac user interface elements, the font was changed to Apple Myriad. This variant of Myriad was used in Apple marketing and was never part of the evolving Aqua design.
The San Francisco font was first used for the user interface of Apple Watch in 2014. Over time all Apple platform user interfaces and marketing have consolidated to use versions of it.
In addition to the font change in 2017, two subtle changes occurred in November 2019. The color of tab bar items changed from white to a light gray. In addition, the icons for Search and Bag became larger.
Changes to come
Six years has passed since the last change to the tab lineup. This is by far the longest the Apple home page tabs have gone without a change to its contents. Previously the longest period of tab bar stability was three years and six months from March 2011 to September 2014, when the Watch tab was added.
With the return of the Store tab, there are now eleven items in the tab bar, the most in its twenty-one year history.
As rumors persist about potential new Apple product lines such as automobiles and augmented reality glasses, will we see another change in the tab lineup soon?
Or as the Store tab reassumes its place in the tab bar pantheon, will this mark the beginning of another era of stability?
Only time will tell what lays in store. •
I’ve been cited as the ‘unofficial Apple home page tabs historian’ in articles at The Loop and Six Colors. Here are a few past articles on this topic that you might enjoy:
Category: Apple
June 7, 2021
I’ll be doing a few things this week at WWDC 2021 and wanted to pass along my schedule. Hope to see you at one or more of these happenings!
Wednesday: LIVE near WWDC 2021
To celebrate the the 20th anniversary of James Dempsey and the Breakpoints, our annual LIVE near WWDC show is a little different this year.
I’ll be joined by a panel of Breakpoints, including Brent Simmons, Jim Dalrymple, Jean MacDonald, and Daniel Steinberg for stories of the past performances, answering questions from the audience, some JDBP trivia and vintage prizes.
Plus, the debut of a new song, Futureproof. After twenty years of writing and performing these songs, it captures some of how I’m feeling at the moment and what I’ve learned is important. The new song has a lot of meaning for me and I hope you can join us to give it a listen.
But the night is more than just stories, music and fun—it’s also a benefit for Black Girls Code. Sign-up for the event is free—we’ll be encouraging attendees to donate to support their mission.
It’s a free event! Click through to get all the details and join the event.
James Dempsey and the Breakpoints, LIVE near WWDC
Wednesday, June 11th, 6:00 PM Pacific
Friday: try! Swift Dub Dub WWDC 2021 Week In Review

I’ll be closing out the week at try! Swift Dub Dub with my eighth annual WWDC Week In Review, a lighthearted musical look back at the announcements and events of the week.
After a week front-loaded with announcements and technical talks, stop by for an easy-going little humorous song.
It’s short, sweet and kicks off the festivities at _try! Swift Dub Dub_ at about 10 AM Pacific on Friday!
try! Swift Dub Dub, June 11, 2021
Opening Session, Friday, June 11th, 10:00 AM Pacific
A Busy WWDC 2020 Week
As usual, it will be a busy WWDC week with plenty of new announcements and technology to wrap our heads around. Feel free to follow me on Twitter and say hello!
I hope you can make it out to one or more of these events—see you at WWDC! •
Categories: Apple, Mac, Music, Software Development, iOS
December 17, 2020
A short exchange on Twitter with a bit of snark led to a friend discovering just how pervasive Facebook tracking is on the web.
Someone I follow on Twitter posted wondering why folks weren’t on Instagram.
I replied that I am trying to avoid Facebook as much as possible.
A friend, Jim Rea, jokingly replied with a flip Yoda quote “There is no try, only do”.
I checked out my friend’s business website and the Safari Privacy Report noted that it was blocking two different Facebook trackers.
So I replied:
“That's much easier said than done.
For example on many websites (including your own) I try to avoid Facebook, but I do end up encountering Facebook tracking scripts.”
Flabbergasted
My friend was completely flabbergasted as this took him completely by surprise. He had no idea there were Facebook tracking scripts on his site.
Jim is a longtime Mac developer. He released the first version of his company’s flagship product, Panorama, in 1988. His app has been around longer than BBEdit. He’s run a successful business as an indie Mac developer for over 30 years.
He contacted me privately because he wasn’t seeing the Facebook tracking that I was seeing. So we did a little investigating.
A Little Investigating
When I inspected the page in Safari using Inspect Element, the Facebook scripts were present. But if I looked at the HTML source that Safari had downloaded, the Facebook scripts were nowhere to be seen.
Some other script embedded in the page was adding the additional Facebook script elements to the page.
His website being important to his business, Jim knew exactly what analytics he was using on his site. This wasn’t a case where he had outsourced the website to someone else. And those analytics scripts were exactly what was in the downloaded HTML.
We figured out that Jim wasn’t seeing the Facebook scripts when he browsed his own site because he had a browser extension installed that prevented the additional scripts from being injected. As soon as he turned off the extension and refreshed—there they were!
Resolution
Jim tracked down and removed the script that was installing the Facebook scripts. You can visit the Provue site to see for yourself.
This episode really brought home for me the incredible pervasiveness of cross-site and cross-app tracking.
It also made me realize the importance of bringing information to light. If it were not for the new Privacy Report in Safari, I would not have dug into that site’s HTML just to make a snarky Twitter comment to a friend. That report makes what had been obscured for many years very obvious and discoverable.
And finally it also demonstrated to me just how insidious and hidden this tracking can be. In this case, even a diligent, technically knowledgable developer ended up unknowingly having Facebook tracking scripts on their site.
Google Analytics And Alternatives
If you visit the Provue site in Safari and look at the Privacy Report, you’ll notice there is one tracker still present, and being prevented from profiling you—Google Analytics.
Google Analytics is very popular and widely used. It can gather extremely detailed site analytics and it is free, except for very high traffic sites.
As an example of its pervasiveness, as of today, the Safari Privacy Report for the popular site Daring Fireball also lists Google Analytics as its only blocked tracker.
Choosing Analytics
I like having some web analytics. I essentially want to know how many visitors showed up and what pages they viewed. On the BuildSettingExtractor site, I like to know how many times the download link was clicked. Seeing referrers is nice too, as it’s often how I find out if a post or site has been linked to in an article or newsletter.
When I moved this site off of Wordpress, I no longer had built-in analytics. I signed up for Google Analytics because it was free. That lasted about two weeks.
It bothered me that Safari needed to block cross-site tracking on my site. Also, I found that Google Analytics is much more complex than I need or want. There also seems like there is a one-day delay in seeing your full analytics. The best thing about it for me was that it is free.
So, I started looking for an alternative. I found a website No More Google that lists privacy-friendly alternatives for various Google products. I looked through the options, comparing features, and found that Fathom was going to be the best choice for me.
Fathom For Me
Fathom provides the set of analytics I was looking for, plus it’s simple and privacy-minded. Fathom doesn’t use cookies, so no need for that annoying cookie notification. The service anonymizes users so no identifiable user information is ever tracked. Finally, Fathom allows you to set up unlimited sites. As someone with multiple low-traffic sites, this was a big plus. Finally, I have a static site, so a self-hosting solutions were not going to be an option.
Fathom is not free but I found the cost reasonable. Its focus is on being a sustainable business that makes its money through selling its service, not by collecting and selling information.
I’ve been using Fathom for about a month now. I’ve been happy with the features and how it works. A support request received an incredibly fast response, so my experience with their support has been good.
If you’re looking for privacy-centric analytics, consider all of the services listed at No More Google.
Of course, different folks have different needs for analytics. But if your needs are similar to mine, I’d recommend taking a look at Fathom. I’ve had a good experience so far.
If you decide to look at Fathom, you can use this affiliate link for $10 off your first invoice. (Ironically the buttons on that page set a cookie to ensure you get the $10 credit.)
To Track Or Not To Track
In the past month, I’ve been thinking about web analytics and tracking scripts for my own sites, but also managed to discover some on a site that surprised the site’s author.
If you have your own sites, you have an opportunity to choose how and if to collect analytics. But even then, it is important to be vigilant, since you could be inadvertently be getting more tracking than you had expected. •
December 14, 2020
Tomorrow will mark twelve weeks that I have done a daily Dance Party! as described in my earlier post.
Three months in seemed like a good milestone to reflect a bit on this still-developing habit—especially now that the initial excitement over starting a new thing has passed—and see how this is working.
The books I have read on habits are Atomic Habits by James Clear and The Power of Habit by Charles Duhigg. I am currently in the midst of reading Good Habits, Bad Habits by Wendy Wood.
Atomic Habits describes four phases of a habit:
- Cue
- Craving
- Response
- Reward
The core of this new habit was hooking into something already existing within me. If a song comes on that I find danceable, there’s a craving to move along with the music, and so dancing is the response. I usually enjoy myself while dancing, so the activity itself serves as some reward.
So, the craving, response, and even reward phases were already things I’ve had for many years.
Why do I have that craving? I don’t know, and I don’t think it really matters.
The big change here was adding a regularly occurring cue. Dance music turns on very loudly in the house every afternoon. (For the curious, the setup is detailed in my Dance Party! post.)
Why has it taken me so many years to figure this out? I also don’t know, but I’m not going to beat myself up over it.
As the weeks have passed, the Apple Watch has helped to reinforce the habit. I have also begun to introduce a few variations to the basic theme.
Avoiding Feeling Bad
I’ve had an Apple Watch since the original, but have never really engaged with the fitness rings. But I’m finding that since starting Dance Party, the rings have served as additional motivation for doing a daily workout.
Although I do have that innate impulse of getting up to dance when some music starts playing, it is not an absolutely foolproof response. Over the last twelve weeks there have been a number of days when the music has started playing and I have just not felt like dancing.
At that point, two thoughts have motivated me. The first is the commitment I made to myself to dance to at least one song when the music comes on. The thought ‘Yeah, I can get up and dance a bit for 3 - 5 minutes’ helps me get started.
But the other thought is about that streak of closed rings in the Fitness app.
I know it will bother me to see that missed day when I look at the Fitness history. I know it will bother me again and again every single time I look at that history. And I know it will bother me more than getting up and dancing to 20 minutes of music will bother me right now.
So, for the last twelve weeks, the gamification aspect of the Fitness app has also been reinforcing the habit.
The cue is still the music, the response is still dancing.
But there is an additional reward in seeing that unbroken streak and additional craving to have the streak continue. And a complementary craving to avoid seeing the streak broken, because I know it will bother me not just today, but for a long time to come.
Variations on a Theme
The core of the Daily Dance Party is fairly simple, but over the first twelve weeks, it has started to take on additional variations. The variations are more complex than the original Cue > Craving > Response > Reward idea, but have been very useful in helping me do a daily workout.
Time
The first variation is time. Although the Dance Party cue is automatic, it is also entirely under my control.
If I’m in the midst of something, I can go into the Home app and set a later time for that day.
If I’m in the mood to dance earlier than scheduled, I can just say “Hey Siri, Dance Party!” and get things moving immediately.
Some days I forget what time I had the Dance Party set for and it is a surprise when the music starts.
Some days I am much more proactive setting the time to accommodate whatever else I have going on that day.
Planned Alternate Workout
For most of the past twelve weeks, I have been participating in a weekly Mindful Qigong class that meets via Zoom.
I treat those classes like any other meeting. They are on my calendar with reminders, including reminders eight hours in advance, so I remember early in the day I have that class coming up in the evening.
On those days, I do an abbreviated Dance Party, usually just one song.
During the class, I use a Tai Chi workout on the watch, which is the closest workout type.
I find the Qigong has been an interesting counterpart to the Daily Dance Party. The Qigong is led and structured movement, while the dancing is freeform and self-directed. Yet both include a variety of similar types of movements. It feels like each reinforces the other.
On-The-Fly Alternate Workout
There have been a few days when I’ve been deep in the midst of something—a project, a nap—when the music comes on and I’ve stopped the music instead of getting up to dance.
The music still serves as a cue, but in those cases it is probably my craving to keep the streak going that is stronger than my craving to dance to the music.
In those cases, my reaction is not to dance, but to make a plan to do an alternative workout. Sometimes that plan is just setting the Dance Party to go off again later in the day.
But sometimes the plan is to substitute an outdoor walk as an alternate workout for that day.
I tend to go for a walk at times with few people around, so usually after dark at 8 pm or so. I have a route that is about 1.75 miles through the winding streets of the neighborhood. I’m socially distanced, carefully avoiding any other pedestrians I might encounter and have a mask with me in case nearby contact is unavoidable.
Apple Fitness+
Apple Fitness+ launches today and I am looking forward to trying it. Even if I do an Apple Fitness+ workout, the cue will likely still be the Dance Party music starting. As I imagine it, I can dance through one song as a warmup, and then do a workout.
It will be interesting to see how I respond to structured workout classes, including dance workouts, as opposed to the very free-form Dance Party.
I’m hoping that the variations I have introduced over the past twelve weeks make it easy to introduce Apple Fitness+ workouts into the mix as additional variations.
As I look back over the past twelve weeks of a Daily Dance Party, it has been interesting to think about my own behavior. Most days are very much a habit—the music comes on, I dance around the house for a while.
But some days there is still thought and decision-making going into the workout. Do I feel like dancing today or would I rather go for a walk? What time does should I set this to in order to avoid loud music going off during a Zoom call?
So, one big change I have noticed is spending more time thinking about, planning, and doing daily workouts.
Since a habit is something you do automatically without consciously thinking about it, I haven’t yet wrapped my head around the meta notion of having a habit of thinking about something regularly. But I do seem to be developing a habit of doing just that.
Will this be a lasting habit? Three months is certainly longer-lasting than zero months, but I still can’t guarantee my future behavior.
But the journey is the reward and I appreciate you reading my thoughts and experiences along the way. •
